Here is my digital portfolio. It displays not only my photography, but other interests that I have been working on. Enjoy!
http://www.wix.com/jessiesalmans/digital-portfolio

Having trouble making your photos look professional? With following this blog you will learn how to make your photos taken with an average camera look extrodinary!
Sunday, April 29, 2012

Thursday, April 26, 2012
Camera Phone
For all those who have yet to purchase a smart phone, this post is for you. I myself have a LG chocolate touch, which is very old and has a poor camera. Taking pics is a drag, and I hate showing my friends on twitter and fb since mine arent up to par considering I love taking photographs. Here is an example of what a photo on my phone looks like with out any editing.
 To edit these photo's to make it look like you used a fancy iphone is simple! First you are going to ahutofix your photograph. All computers have this setting and it will change your photo minor. Then you are going to adjust the hue depending on the colors in your photo. I have cool colors, so I will enhance those in my photo.


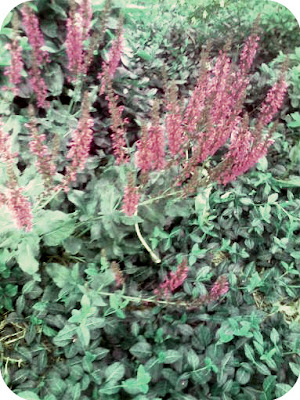


Next you will sharpen your photo and I changed the color in the flowers to brighten the picture, but this is optional. If you would like to do this go to www.fotoflexer.com and choose the Color Rotate option.


Last I'm going to soften the photo since the colors now are a little intense. I'm going to do this by adding just a little sepia to the photo and rounding the edges. This will create a look like looks like you took it on your iphone and even touched it up using instagram. For people who dont have this luxury, its great to edit the photo's to still share them with friends and family. It is also nice because it only take a couple of steps and less then 5 minutes to do!
Monday, April 23, 2012
Fisheye

Directly above is a fish eye photo. Most people don't know what this is, but when they see the image they understand the name. Most photographers spend a lot of money on special lenses to make their photo's appear as if they are literally in a fish bowl. I'm going to show you how in 3 easy steps how to create this look with just editing!

Here is your starting image. The first step you are going to want to do is crop the photo with a circle/oval shape. If your computer doesn't allow this then you can doin it on paint very easily. It has a preset circle crop button that will allow you to do this.

I'm going to use the oval shape to create a different image than my first example. Next you are going to blur the edges. This might take multiple times to blue the image enough to make it look like it is in a bowl. It took me 4 times to get the blur that I wanted for this effect.


Last step if you are going to chage the background of the image to black to emphasize the shape. If your computer doesn't allow you to paintbucket the background you can you FotoFlexer editing. It is a free website that allows really cool edits. I decided to use this to show you the process. I used the border tool and clicked on vigenette/matte. This basically means it is sofening the edges only instead of white it will be useing black.

You are finished! Now you have a photo that has the same effect as a fishbowl lense and didn't have to spend a dime. This also makes this look like you used photoshop or had a professional edit your photograph for you.
Wednesday, April 4, 2012
Nature Photography

Spring is my favorite time of year and the best time to shoot because of all the bright colors. When taking pictures of nature you want to make sure that you are just enhancing the photograph and not changing it completely. The photograph above is a good example of a photograph that is edited well, and the photograph below is an example of a photograph that is edited too much!


This is my favorite nature photograph ever taken and it’s called the "Chameleon" What makes this camera good is the bright colors that displays the natural beauty of the plant. You can tell that this picture has been edited, but you still see the natural detail in the plant. When a photo is edited too much, it tends to start looking fake and unreal.
Saturday, March 31, 2012
Engagment
These are two pictures I took today of my sister Nicole and Reece my future brother in law! Congrats Nicole and Reece, love ya guys


Tuesday, March 27, 2012
Abstract Photography
Most people do not know what Abstract Photography is. According to dictionary.com abstract means... "of or pertaining to the formal aspect of art, emphasizing lines, colors, generalized or geometrical forms, etc., especially with reference to their relationship to one another." An example of an abstract photo that I've taken would be,

 When I'm looking to take abstract shots, I tend to be drawn towards textures. Even though I'm drawn towards this characteristic, its not the only one for abstract photos. Usually its a clean image with high intensity where you can identify the object thats being taken. Most of these picture have high contrast and they are very close shots.
 The image above was inspired by the famous photographer Brassi. As you can see this abstract photo is high in constrast because it is black and white. It also has texture and has a repetitave pattern which creates abstract. Even though you know the photo is tire tracks in snow, it isn't apparent at first glance. Hope you are inspired to take your own abstract photos and just remember these three words when shooting... contrast, texture, and the unkown.


Monday, March 5, 2012
Good Places to Shoot
View Larger Map
Here as a Washburn student its sometimes hard to think of places to take pictures in Topeka. My top four places to do so are displayed here on this map. 1. Chesney Park 2. Shimer Park 3.Lakewood Park and 4.Downtown. So far I have been to all of these places and have really enjoyed them. If you don't decide to take pictures these are still great places to have a lovely afternoon of nature and great sights!


Sunday, March 4, 2012
Classy Camera Photography
http://www.wix.com/jessiesalmans/classycamera
Check out my new website showcases my photography.
Check out my new website showcases my photography.
Thursday, March 1, 2012
Architectural Phtography
Architectural photo's are so much fun to edit because it doesn't matter what it looks like. For those of you who dont know what abstract photos are, its a photograph that is unusual and modern. Its not supposed to be recognizable and its usually very colorful as well! You will first start out with a photo with very high contrast. It doesn't matter what the photo is just one that will allow you to create a dramatic change.

Next you are going to invert your photo. This will create color that will allow you to use the paint bucket on it. Or if you are using a editing program you can pick the duo-tone option and it will do the same thing. After you invert the phot you will be able to pick any two colors to change your photo's image.
inverted: duo-tone:


Don't worry if you don't like the color of the photo you can always change it again. Next you will add contrast. For my photo it brought out the background of this particular image. It might not have the same effect on your image. Then for a personal touch i'm going to blur the edges of my photo just to make it look a little more abstract. You do not have to do this to your photo.
contrast: personalized:


Next you are going to add some texture to the photo. You can do this by spray painting the photograph lightly. I did this in photoshop by over leying the photograph. You do this by taking another photo and placing it underneath the original. They you take the opacity of the photo on time and minimize it slightly.
overley:

Last finally you are going to either add higher contrat once again to bring out the textured photo, or you can change the color completely again. I wanted something that was lighter for the patter so I simply inverted the photo again. This is a really cool way to create personalized artwork. Most stores can blow up photos to bigger than most posters. So get it framed and have everyone ask you where you got that expensive painting.

Monday, February 27, 2012
Photo Journal
Hey everyone,
Please check out my new Photo Journal I put together! These are my favorite photographs from 2010-2012. Now I'll be able to start a new book and get some new excting photographs out there. :)
Thank you,
Jessie
Please check out my new Photo Journal I put together! These are my favorite photographs from 2010-2012. Now I'll be able to start a new book and get some new excting photographs out there. :)
Thank you,
Jessie
Saturday, February 25, 2012
Thursday, February 16, 2012
Antique
This post is going to show you how to make a regular picture look old. Most people are thinking why would you want to make your pictures look old? Well, antique photographs are more of an art peice. These photos will be awesome to look at, and it will creat new editing techniques that you can use for the future!


starting photo:

You can really pick any picture for this edit. Just be careful because something editing people with an antique finish can be a lot harder than just outside, or an object. First step will to add slight contrast and then secondly you will want to make your photo a dark sepia. You will want this sepia to be dark brown and not light brown because of the future edits to come.
contrast: sepia:


Next you will want to make your photo look grainy. You will do this by darkening your photo and then adjusting the saturation. Next I decided to lighten the picture because most old photographs were not fully developed. It left copper in the photograph creating the look below. I also decided to round the edges to personalize the photo. You do not have to do this, but if you want to it is really easy to do in paint with the shape tool. Unless you have photoshop then there is an automatic edit.
grain: personalization:


The fifth step will be to wash out your photo by lowering contrast and lightening your photo yet again. You are probably wondering why did you add contrast at the beginning and now you are taking it away. Because the ordering of your edits it will make a difference on how your photo looks. Next I lowered the tempurature of the photo to make sure that the copper brown wasn't to present. If the photo is too brown it will look forced.
wash out: tempurature:


The final step is a little advance so you do not have to do this step if its too complicated for you. This step you are going to crop your photo and then over lap and rotate those croppings. This edit is easiest in photoshop, but do-able in paint. Then you need to blur the overlaped peices and this will create the effect of the photo being bent or wore-down. This is the ultimate antique photograph and hope these steps helped you understand more about old photo's!
FINAL PHOTO:

Sunday, February 12, 2012
People
The next how to is over people. People are one of the hardest things to photograph! Its all about lighting and of course the editing. My sister is the ginny pig in this next how to. I will how to show you on how to make a indoor photograph of a person look like a professional portrait shot. Just like any photo I'm going to start by cropping it off center.
Cropped Off Center:

Blurred: Over-touched:


This step you are going to touch up. Here you will add white to the teeth, most people already do this. Just make sure not to make them fake looking. A helpful hint that no one really knows about is whitening the eyes as well. This makes eyes look brighter and enhances the persons look.


Cropped Off Center:

Then you are going to take you photo and blur the background. You also might want to blend the face, but make sure while you do this to not blur the eyes, teeth, and hair.. this way the photo will look and not over touched. Most people tend to over touch photographs of people where it doesn't look like the person that started. No one wants that to happen!
Blurred: Over-touched:


Next you are going to add contrast and some saturation, this gives color and depth to the photograph. If you forgot how to do this refer yourself to the previous post over black and white photographs. Another helpful hint is use a solid color as your background like this photo. For beginners it gives the photo a more complete look. When you start to feel more comfortable editing you can take your photo's outside.
Contrast/Saturation:

This step you are going to touch up. Here you will add white to the teeth, most people already do this. Just make sure not to make them fake looking. A helpful hint that no one really knows about is whitening the eyes as well. This makes eyes look brighter and enhances the persons look.
Touch Up: Too Much:


Last step you will brighten the photo! This you will lighten only slightly creating natural lighting even though you took the picture inside on a cold morning. Now you are good with editing people. Next blog post I will be able to help you out with moving people and people outdoors. This was just the first lesson on editing people!
Ending Photo:

Sunday, February 5, 2012
Black & White
When editing black and white pictures most people focus on the colors black, white, and grey. However... I'm going to show you that focusing on the color of the photo is vital in when editing in black and white.
The first step you will want to do is crop your picture. By making the picutre semetrical you are making the eye wonder to other parts of the photo. When you make your picture cropped off-center, you are creating a focal point that immediatly the eye is drawn to.
BEFORE: AFTER:


The first step you will want to do is crop your picture. By making the picutre semetrical you are making the eye wonder to other parts of the photo. When you make your picture cropped off-center, you are creating a focal point that immediatly the eye is drawn to.
BEFORE: AFTER:


The second step on making your black and white photo is to click the adjust color: saturation button, which should be available with all pc computers. Then you are going to drag it completely to the left; getting rid of all color in the photo. This is where most people stop, but you will make your photo look betting in just three more steps!

all saturation gone
The next two steps are fairly simple. You are going to adjust the contrast, and the brightness. This basically means make the black's darker and the whites in the photo whiter. For this photo above you will make the photo 1/4 lighter and 1/4 more contrast. Each photo will depend on the different colors involved, but those variations are pretty standard.
Brightness: Contrast:


Now, you will adjust the color of this black and white photo! It sounds crazy, but it looks great. Since this photo was of a sunflower we know yellow is the main warm color in it. So you are going to take the TINT of the photo and increase it to bring out the warm colors and darken the cool colors.
Before: After:


The last step will be to increase the color tempurature slightly. This will create a less harsh black and bring out some of the small details of the photo. You just created your first professional looking photo, make sure to show all your friends and family... they will be impressed!
FINAL:

Subscribe to:
Posts (Atom)